Sorry for being gone so long! I have some nail designs I did since my last posting that I will update here soon.
Jaided

Tuesday, March 24, 2015
Tuesday, June 25, 2013
All That Glitters is... Glue???
In my previous post, I
had written about how difficult it was to get the “Rockstar”
glitter polish off my nails. I know
there are a ton of different tips and tricks for this out there on the
internet and I've tried a few. One that I hadn't tried was using Elmers Glue as a basecoat.
I always try and research things before I try them. So I went on a hunt to see what people were saying about the glue method. I found a video and decided it was good enough to get me to give it a go. If you want to see the video I watched just click the link below.
By BevyOfNails
So I am going to tell
you what I did, how I did it and what the process was like.
The first thing I did was
apply a Top Coat over my nails. I used a top coat instead of a base coat
because my base coat is very thin and I wanted something a little thicker.
Once my Top Coat was dry, I started to apply the glue. It could be the glue
that I used, but it was a bit gummy. It was a little difficult to apply
evenly, but I did manage to get it on there. After the first coat dried, I
decided to apply a second coat for good measure.
With the 2 coats on and completely dry, I looked at my nails. The glue did not go on very smoothly. There were small ridges and scuffs. But in all honesty, that wasn’t going to be a big problem. When you use Glitter polishes, especially ones heavy on glitter, it fills in the ridges etc and makes them disappear. I wasn’t worried.  I applied a base coat of nail color. I chose Kleancolor #162 Metallic Yellow. I only needed one coat. The Kleancolor Metallics go on really well. Next step, I applied 3 heavy coats of Kleancolor #297 Almost Good As Gold. This glitter is a very chunky glitter, this is why I applied 3 coats. I wanted to get as much on as I could for this test. Next I applied a coat of Seche Vite Top Coat. Being me… I didn’t stop there. I also applied a black stamp over the top and this was my result. 
Now the big question… Would
it stay on and for how long?
I did my usual duties, washed dishes, typed on the computer, washed my hands a lot etc, etc. This manicure was still on after 2 days. I was pretty impressed. The big test of course would be how easy it would be to take all of this off and I just couldn’t wait anymore.
So I decided to start with my Thumb Nail. Using just my fingernail,
I was able to pry off the thumbnail very easily. I was shocked at how easy it
was. All of the polish came off as a whole. Unlike the girl in the video I posted
a link to, I had no trouble at all, and no multiple pieces or left overs on the nails at all. Wow!
BUT….. I do want to tell you that after I took off the thumb nail, I did notice that the nail on my ring finger had no polish on it… so that one must have fallen off without me even noticing. I have no idea when or where it came off. So this method isn’t perfect.. but I think if your polish comes off and you know where it is, and if it is in one piece like mine was… you could probably apply some top coat or better yet, another layer of glue to your nail and restick it down. That’s just a guess as I haven’t tried it. So here are my nails and the polish. 
I would recommend using the glue method for nails with a lot of glitter, but I would suggest you keep a clean eye on them in case any of them fall off. It was the easiest time I have ever had removing a manicure of any kind. I was pretty impressed. So give it a try and let me know how you do with it.
 |

Playing Catch Up!
Catching Up
Well, with my short nails I haven’t been very inspired. That’s why there haven’t been any updates recently. Not that I didn’t do anything with my nails, I did, but nothing I was overly excited to show off. So this post will be catching you up on the few things I did.
Next I wanted to get some polish on my nails. I bought a few more colors just to round out my collection. I found a seller on Ebay who was selling lots in different sizes of Kleancolor Nail Polishes and you got to pick your own colors from the 250+ selection. I believe I paid 13.99 and Free Shipping. You pick your 10 colors and then choose 3 back up colors in case any you chose are out of stock. Well one of the colors I received was a backup called “2.2 Tango” and decided to see how that looked. The pictures below don’t do any justice to the actual color and look. Very pretty!
My next manicure was kind of fun! I was born and raised 3 miles from
I also bought myself some Practice Fingers to play around with. I thought it would be a good idea to have some nice long nails to play with. I could test colors and designs without having to do it on my own nails and use a lot of polish remover. The first thing I did was apply an acrylic nail so I had some length to work with. Then some polish and some stamping and added some rhinestones. It was fun to play with.
This last one (for this post) is this beautiful glitter called “Rockstar” by Sally Hansen Xtreme Wear. I had it on all of my nails. In the bottle it is so sparkly and pretty and definitely looks purple. I didn’t use any base coat and I applied 3 layers of the polish. I could have gotten away with 2, but I wanted it really thick. Well in the sun, I swear it looks red, white and blue. Very Patriotic! I REALLY liked it a lot… but what a pain to get off… and that’s with using the pure acetone. Ugh! 
So I am caught up…. But I have 1 more post coming after this one. I tried the Glue base for glitter polishes and will write a separate post about that.
Hammer away at those Nails!
|


Monday, June 10, 2013
Ocean Seaweed Manicure
I
was going to leave my nails naked for a few days and let them breathe, but I
decided to toss something on them just so I can have some sparkle. This
manicure is just a quick, basic, get-something-on-them
kind of thing. So nothing great really.

Jordana Garlic
Growth Base Coat as a Base Coat - 1 Coat
Kleancolor #163 Metallic
Green as the Base Color - 1 Coat
Kleancolor #301 Pacific
Dream for the Sparkle - 2 Swipes
Seche Vite Dry Fast Top Coat - Top Coat - 1 Coats.
I think lighter colors
are best on short nails. I should probably go lighter. I wish I hadn’t cut my
nails!
What was I thinking? |
Sunday, June 9, 2013
A Good Time Nail Party!
It’s a Nail Party!
 My Sister had company come up and visit from Included in the seven were two young ladies and an adorable 6 year old.
I saw a perfect
opportunity to do some manicures.

I laid almost everything
I have out on the table, and I think they were surprised by how much I had.
It was my demonstration of what an obsession can look like. There were
30 tiny nails all waiting to dive in.
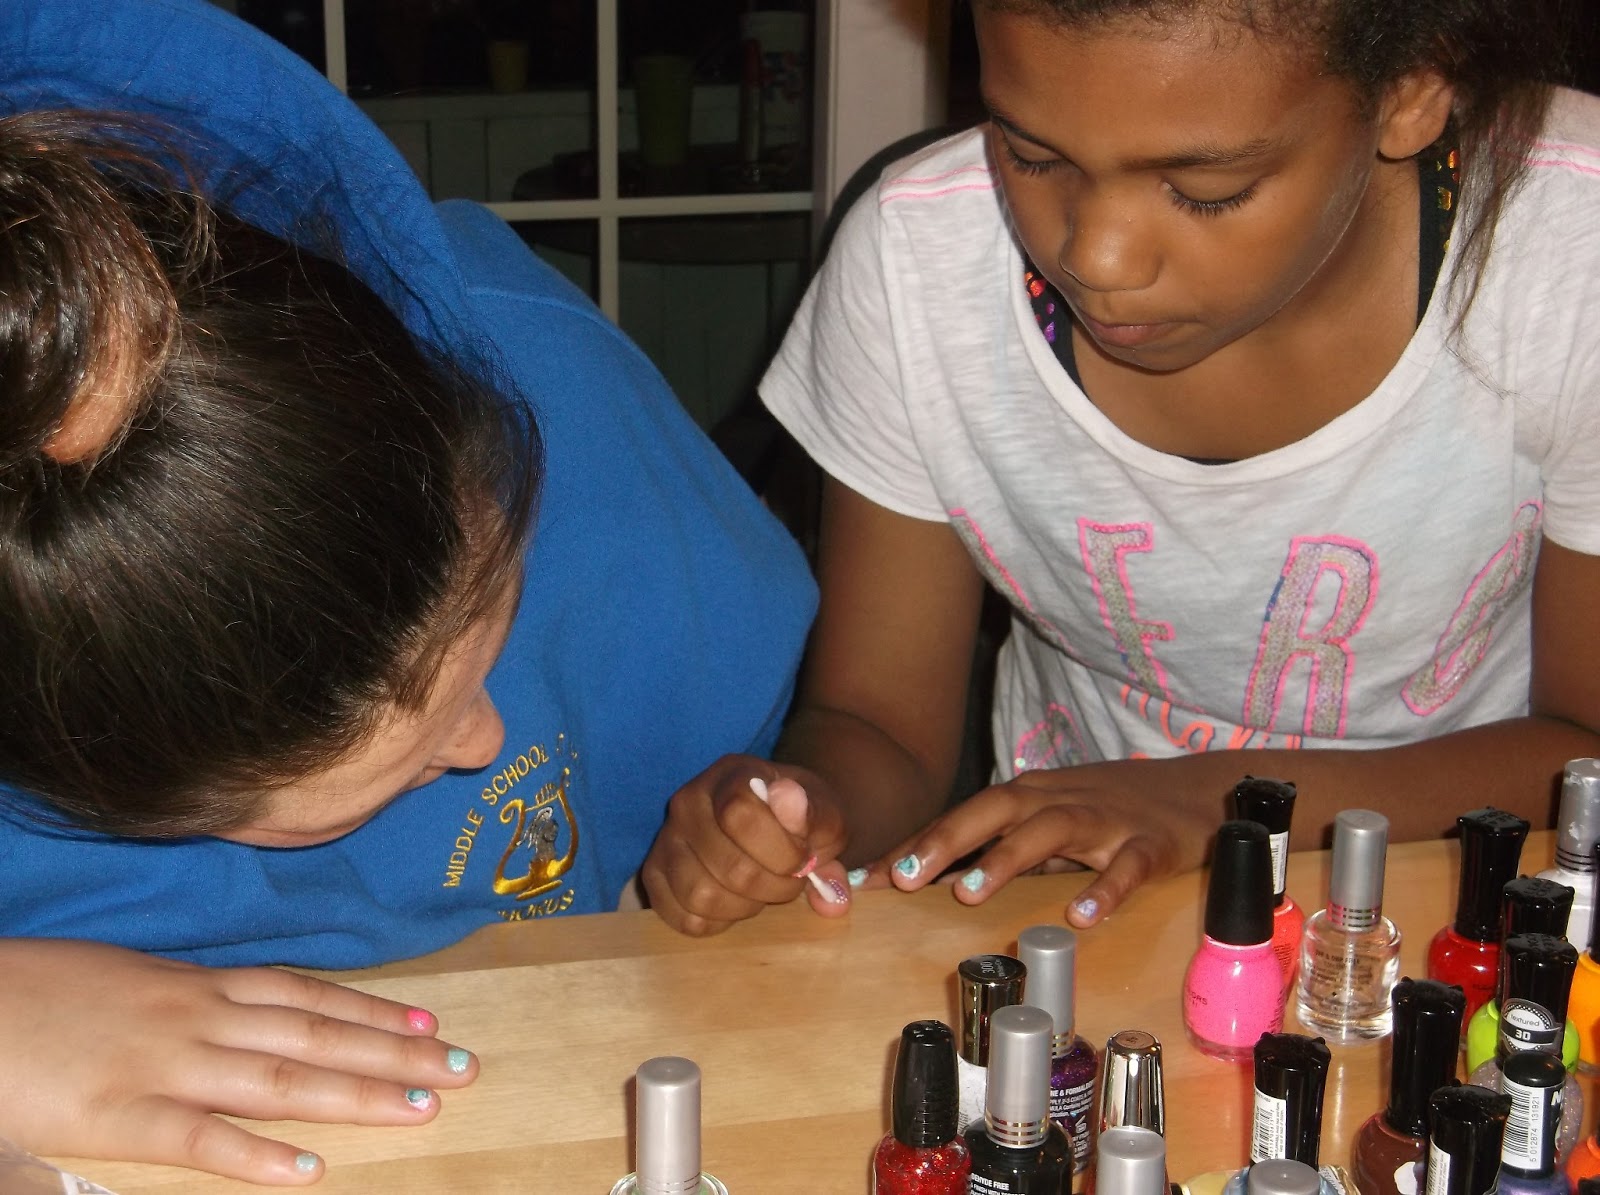
First I gave everyone a paper plate to test different colors on so they would be sure of what they actually wanted. This was smart because it meant less polish removing so as not to damage their young nails.
Sharai is
a very adorable little 6 year old with
boundless energy! Of course she wanted to play around with polishes too. Her
Mom Sonya did her fingernails. I didn't get a picture of them,
but Sharai painted her
own little toes all by herself. Good Job Kiddo!
Sharai and her Mom Sonya
painting nails

Kiki and her friend Jaylyn
took their time to decide what they wanted. They loved the pinks, teals and
purples. I can’t blame them, I do too! They decided on which colors they
wanted to work with and away they went. Boy those are some small nails. I
painted some of Kiki’s and it just proved my eyes
are getting old. LOL… Poor kid… I had a lot of fixing to do. The nails she
painted on her own were perfect.
We added some waterslides. This was a little trial and error. Mainly because the polish color we were putting them on drowned out the images. Thankfully waterslides are easy to remove if you haven’t added a top coat yet. Eventually we got it right. Kiki settled on a Sully for one hand and a Boo for the other. Jaylyn chose a Sully and a purple flower. Of course if you’re gonna have a nail party you need to go all the way! Stamping would be next. I showed Jaylyn once how to do a good stamp and she took to it like a pro! I was so impressed. She was knocking out her nail stamps like she had been doing them her whole young life. She did a perfect job! She enjoyed it so much, she did Kiki’s stamps for her.
That wasn’t quite enough… so Kiki added some colored rhinestones to her nails. She was using tweezers to get those tiny things on her nails. I showed her how I do them, and guess what? Her way was better… so thanks for that tip Kiki!! So here are their end results… I am so very impressed by what these girls did.
 So get your friends together and have a nail party… you won’t be sorry!
Jaided
|


Friday, June 7, 2013
Pink / PINK
My Sister has a pretty
decent selection of nail polishes to choose from. While I was visiting her
she decided she needed to do her nails. Never a problem for me. She dug
through her bag and was trying to decide which colors she wanted to do. This
is what she came up with.
For This Manicure She Used
:
This
polish goes on really smooth. You definitely should do a minimum of two coats
to really get the color to show well. What I loved about this manicure is
that she did a mini French Tip instead of doing the entire top of the nail.
It looked great because when she held her hands up to the light, her nails
looked like they were done in a gradient because the light was shining
through the un-tipped part of the nail. It was unintentional, but a great
effect.
End
Result

----------------------
Sisters that
Polish Together, Stay Together!
Have Fun!
Jaided
|


Wednesday, June 5, 2013
Tangerine Burst Manicure
Right up my alley! Bright, Cheery, Polka Dots and Flowers!
But first let’s talk about my Acrylic Nail.
Now onto my Tangerine Burst Manicure! My original plan was to do a Black Matte layer with a layer of shiny black over it. I have wanted to play with a Matte finish for awhile, so why not? When I sat down to do my nails, I just wasn’t feeling the black at all. Out pops my Tangerine Burst nail polish. The color was so bright and cheery, I couldn’t resist it. It goes on pretty smooth. I did 2 coats and just drooled over the color. It takes awhile to dry so keep that in mind if you use this polish. The Colors I Chose to Work With This Time Were :
I cruised Nail Art on Google Images to get some ideas. I found one I really liked and decided to do my own spin on it. This was the image I found.Which is from http://prettynaildesigns.org. 
I
liked the idea of a half painted nail, and I honestly never would have
thought of covering it with a nail stamp. I don’t have my colored gems etc
yet and I wanted to keep it simple anyway. So that was my inspiration.

Shine
On!
Jaided
UPDATE : The acrylic nail has been on for 5 days now with no issues. I have added and removed polish from it a few times now and it is still firmly on and in tact. Pretty good I say.
|
|||||||||||||||||||||||||||||


Monday, June 3, 2013
Metallic Aqua with Dia-mond French Tips!
Recently I did a blog about my Sister and some manicures we did. I think it was an adventure to stamping or something like that. Anyway... My sister said that red glitter manicure was a pain to get off. Well no surprise there! There were at least 4 layers of glitter and even one layer of glitter can be a pain!
But my Sister has her own taste and style, and basically she loves colored nails with sparkly french tips. I can't lie... I do love how it looks.
So here are a couple of snapshots of her latest manicure. Back to her own style.. and as you can see, quite lovely in itself.
For this manicure she used :
Kleancolor #134 Metallic Teal - 1 Coat
Nail Art by Diamond Cosmetics Glitter Lites - 2 Coats


Well... That's it for this update! You can never go wrong with French Tips... especially when they sparkle and I think I love the Metallic Aqua!
Peace
Jaided
But my Sister has her own taste and style, and basically she loves colored nails with sparkly french tips. I can't lie... I do love how it looks.
So here are a couple of snapshots of her latest manicure. Back to her own style.. and as you can see, quite lovely in itself.
For this manicure she used :
Kleancolor #134 Metallic Teal - 1 Coat
Nail Art by Diamond Cosmetics Glitter Lites - 2 Coats
NYC #271 Extra Shines Top Coat - 1 Coat


Well... That's it for this update! You can never go wrong with French Tips... especially when they sparkle and I think I love the Metallic Aqua!
Peace
Jaided
Sunday, June 2, 2013
Denim Fairy Garden Manicure
I wonder how long it’s gonna
take me to run out of names for these manicures? Hmmm.
Anyway… I was digging through my bag of polishes and felt overwhelmed. I had no idea what colors to work with, or even what design I wanted. It was The Colors I Chose to Work With This Time Were :
I
like the color of the Pastel Blue. This
particular polish is kind of thin. It took 3 coats to get good coverage and
show the color as it looks in the bottle. It looked so bright and cheery. I
liked it.
However, The Kleancolor Holo nail polishes are not clear. Each one is tinted
in the color it is representing. This is kind of a bummer to me because it
took my bright blue and made it darker. If you look at the picture of the
nail polish color above and the final product, you can see how much the Holo Chrome darkened it.
That was ok.. the amazing colors and sparkle were worth it, and it wasn’t horribly dark.
I
know people always say “Less is More” but I can’t seem to remember that when
it comes to my nails. I decided more is MORE! So I yanked out my white and
chose a stamp and away I went. This plate stamped really clean and was so
easy to work with.
In the end, I like it! It still says spring to me. 
Keep
Nailing It!
Jaided
|
||||||||||||||||||||


Subscribe to:
Posts (Atom)